
Photoshop Backgrounds, Patterns, Textures & Tutorials
Our Newsletter
Would you like to receive special offers, tips and occasional free samples?
Sign Up Here


Painting with a Single Texture Map |
|
By Rick Wetzel Choose a texture that has variation in it but is essentially gray in color. Its OK to have some color present but we'll be manipulating and adding more color later on. I chose a 72 DPI image for this tip page, but you can use virtually any resolution that is appropriate |
|
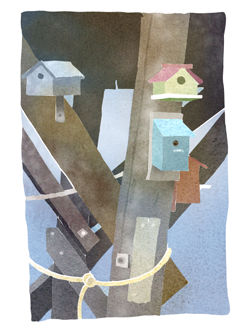 |
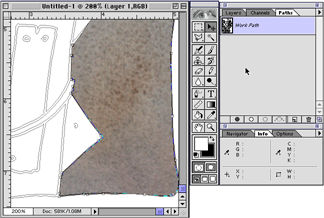
The line drawing I chose was one of my own creations. Any clip art will do fine. Try to avoid any art that has cross hatching for shading as this will only get in the way when we start "painting". I scanned my drawing, as line art, and used Adobe Streamline to convert it into a vector illustration. Step 1 The object is to bring paths into Photoshop. I first open the Streamline file in Illustrator, then copy it and paste it "as paths" in Photoshop. Unfortunately, you can't just open the converted Streamline file directly in Photoshop, as the paths will be lost! |
|
Step 2 You might have noticed by now that the line work was been totally removed from the finished piece. You could leave the line but I'm looking for that hand painted look. Our first step is to hide the line work. Activate the line drawing window. In a vector drawing, the edge of the line is described. So you can make the line weight heavier or in this case non-existent. Our goal for this step is to make each block of color larger, one at a time, by hand. |
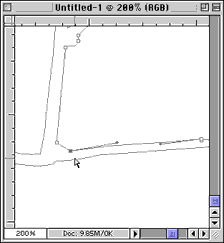 |
The screen shots on the right illustrates the process.
To eliminate the line, select the marquee tool.
After you have enlarged a section of your drawing, you can add the previously copied texture. |
 |
|
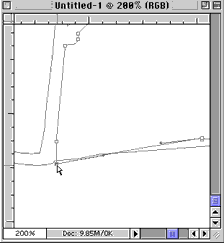
Step 3 With the section still highlighted you must still select it (strange but true). Go to the Layers Palette, and choose the "Paths" tab. Pull down on the small triangle menu bar and select "make selection". Later on, when we will want to view our progress, we will want to turn off the path. This is where you go. With your selection now displaying "running ants" you're ready to paste into your selection. You can find paste into under edit. Technically, if you were to select and paste every "cell" of your new painting it would look like your texture background. But we aren't going to wait. With the "cell" still selected, we are going to manipulate the color and value of the area in the next step. |
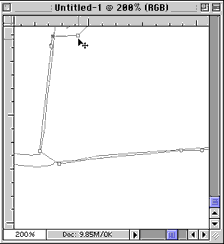 |
Step 4 Now, with the pre-existing texture image already on your clipboard, chose "Paste Into" from the Edit menu. As a bonus, in Photoshop 5, you automatically will have created a layer and a potential mask. |
 |
